The Amazing, Auto-Documenting Admin Panel
See how Orchid's unique admin panel documents your build for you.
Introduction
If you've been following along with these tutorials or been exploring some of the other great Orchid plugins, you may be starting to realize just how much you can do with Orchid, and especially how difficult it can be to remember exactly how to use it all. It can be a bit tricky to navigate the documentation to find that one little snippet of code you need, and you have to hope that it is up-to-date and hasn't changed if you're not yet on the latest version.
Fortunately, Orchid has a solution for all of these problems: an admin panel which brings the most relevant documentation to you in one central location, perfectly up-to-date with your version of Orchid. This tutorial will walk you through setting up this plugin and navigating the admin panel to help you find what you need. And it
Before continuing, make sure you have followed along with the previous tutorial and have started your local Orchid
server with gradle orchidServe. We will be building on that example in this tutorial.
You can follow along with this tutorial on your own, or find the source for this in the OrchidTutorials repository.
First Things First
Orchid is fundamentally created to be flexible and pluggable. The static pages we've been using to build our site is actually just a plugin, building on the core framework with an opinionated way to make static pages! This allows you to pick-and-choose exactly the features you want to use in your site, and not be given a ton of stuff you'll never use.
Orchid's admin panel is another feature that is available as a plugin, and is not included by default. Let's go ahead and get our site set up with this new plugin.
Adding the "Plugin Docs" plugin
As Orchid is a Java-based framework, it takes full advantage of several well-known tools for managing plugins. Plugins are distributed as a normal Maven dependencies, and when included on the classpath are bootstrapped automatically with no further configuration needed.
What this means for you is that adding a single line to your build.gradle is all you need to do to install the admin
panel. Add the following dependency, and you're good to go!
orchidCompile "io.github.javaeden.orchid:OrchidPluginDocs:0.21.2"
You'll need to fully restart Orchid in order for the new dependency to be added, but once it's started back up try visiting http://localhost:8080/admin to see your shiny new admin panel, and then read on to learn how to use it!
Admin Panel Features
Collection Inspection
In the previous tutorials I've shown you how to create links to pages in your site, from both template function and menu
items. I just told you how to scope your page links so they select exactly the page you expect, which is a unique
combination of itemId (the page title), collectionId and collectionType.
I showed you how to find these collectionId and collectionType values for the Pages plugin, but what if I never told
them to you? How would you ever know what the collectionId and collectionType is? This is the first problem that
Orchid's admin panel can solve for you.
Let's start by opening up the "manage panel", by clicking "Manage" on the top-right of the page. It will open up a popup panel that looks like the following:
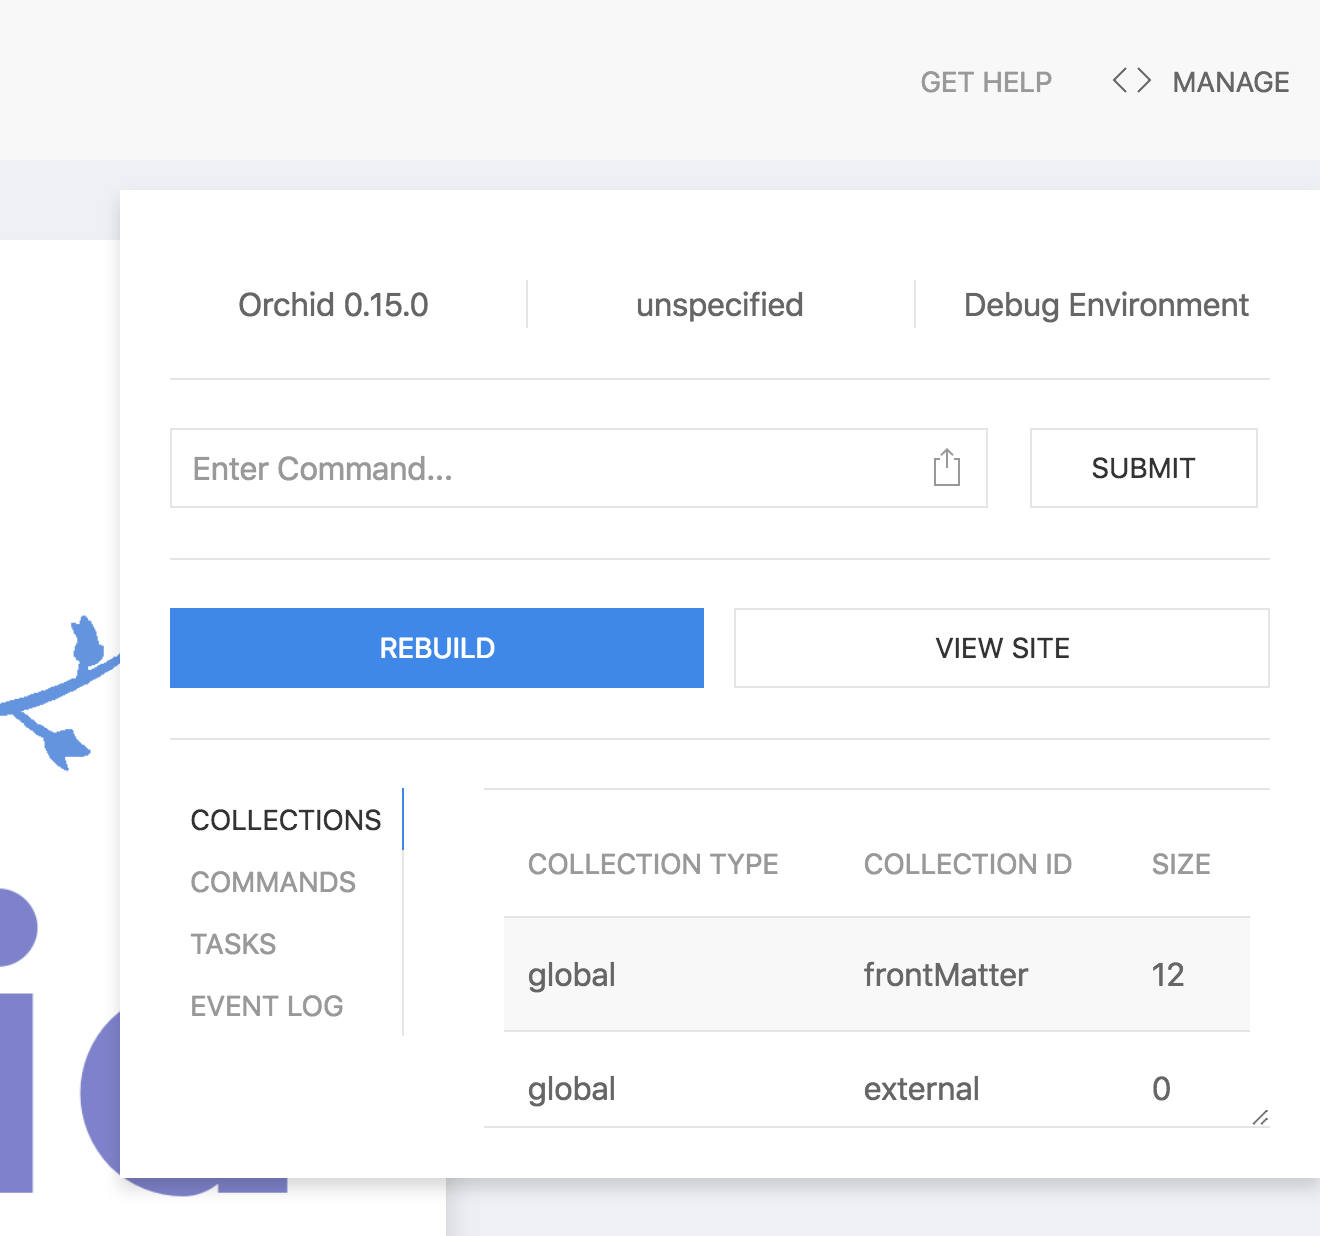
There is a lot of cool stuff you can find in this panel, but the important bit is the table to the bottom-right of it.
The headers of this table are exactly the collectionId and collectionType we didn't know how to find before! You
knew that you had collections for the "page groups", but there are several other collections in there too!
Each plugin that produces pages will also create collections for those pages, and they will all be reflected in this list. That means that this table is able to fully capture all collections of pages from all plugins you install or create, not just the official Orchid plugins. This fact alone can be quite helpful as it becomes a quick reference for finding the exact values needed to filter page links, but there is more to these collections that Orchid's admin panel can unlock. Let's click on the "pages, locations" row of that table, you should be taken to a page that looks like this:
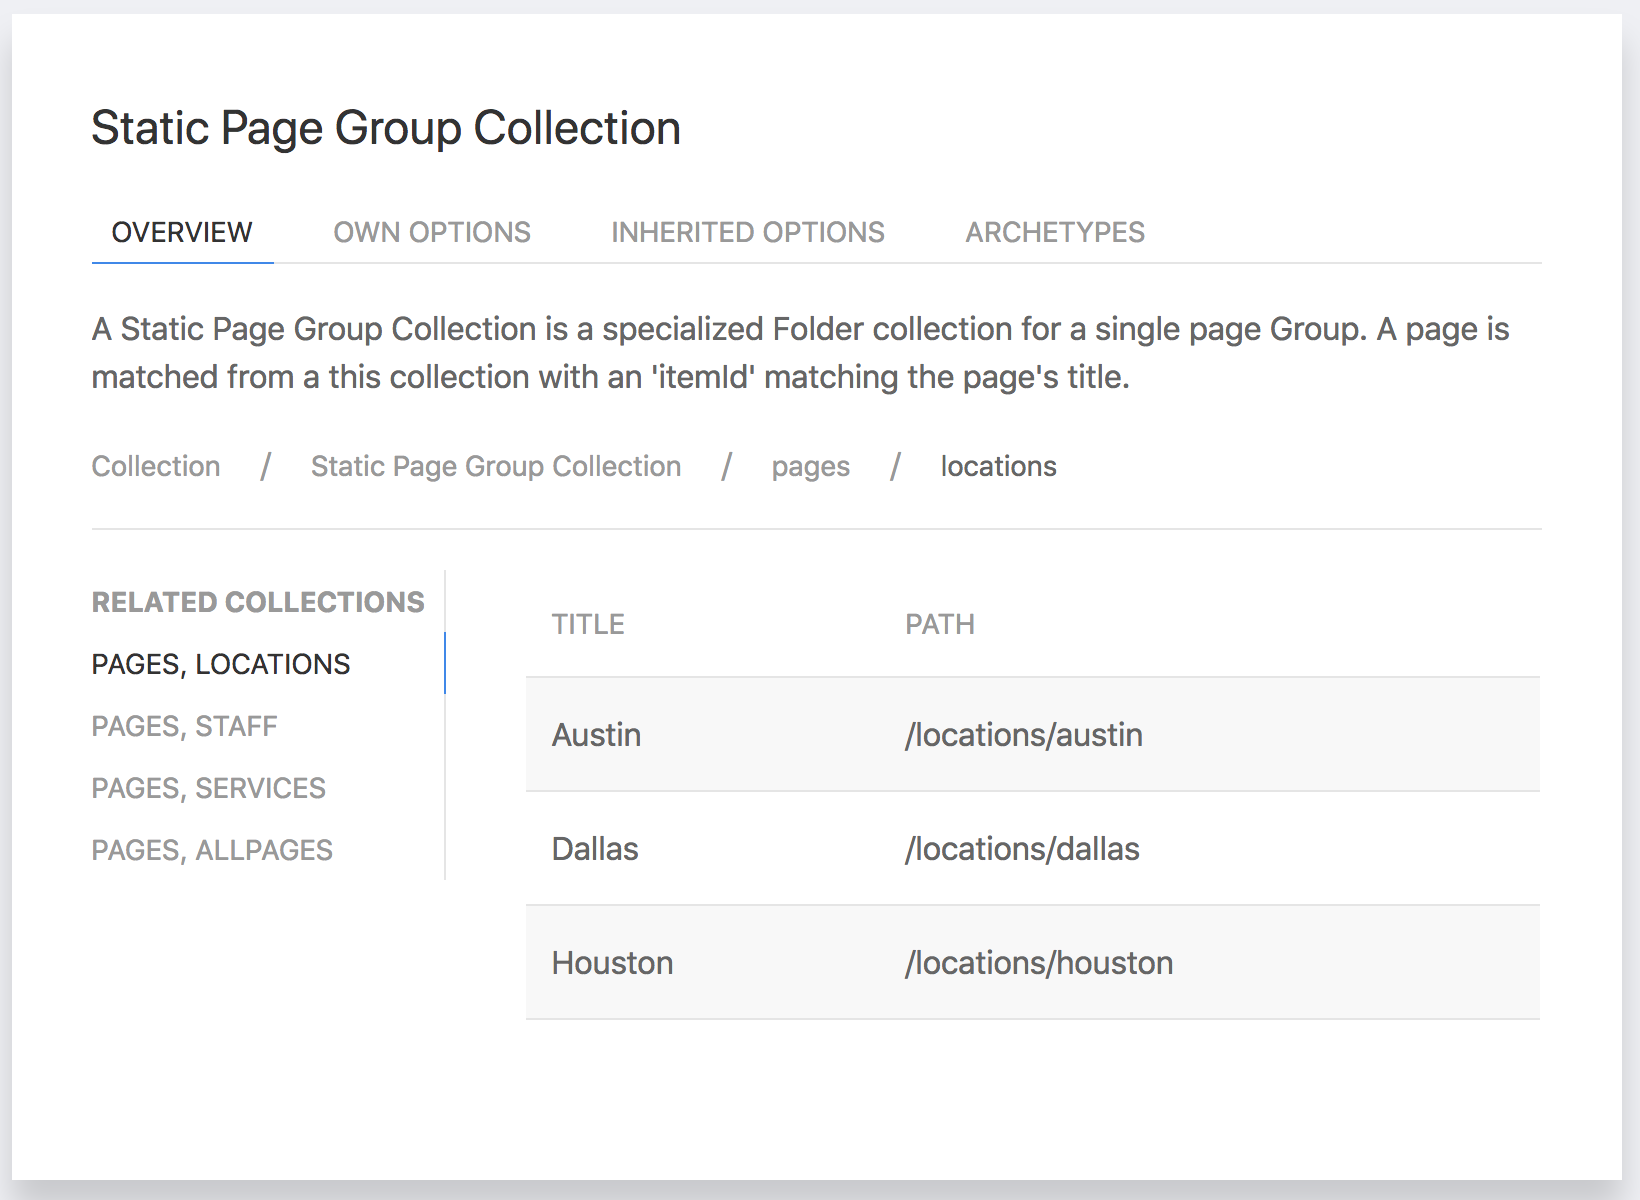
There's a lot going on in this page, but let's break it down a bit. It has 4 tabs, but we'll just look at the first one for now. I'll get back to the other three tabs in just a bit.
This page starts with a description of the collection. I mentioned above that the itemId is typically the title of the
page. This value is actually determined by the collection, and it will be described in this section. So the "manage
panel" will show you the collectionId and collectionType, and clicking into it will tell you how to link to its'
itemId which is the last piece needed to uniquely link to a page. There's no magic to locating pages in Orchid, it's
all easily accessible in the Admin panel!
Below the description, you will see a list of related collections. These are collections that share a collectionType
with the one you're currently viewing. A single plugin will typically produce several collections, and they should all
be related to one another by having a common collectionType. This sidebar makes it easy to explore all collections
from a single plugin.
Next to the list of related collections, you'll find a table containing all the pages contained within the current
collection which are able to be selected individually with a corresponding itemId. These pages show its title (because
it is commonly used as the itemId), and also its URL so you can be sure you know which page it is. Clicking on any row
in this table will take you to that page.
Plugin Discovery and Documentation
Now that we've got an understanding of how to find all collections that your plugins generate, let's find out what other kind of information the admin panel offers us.
In tutorial 5, we learned how Orchid generates your site menus for you, and I introduced a few different menu items that are useful for creating dynamic menus. But just like the collections, how would you have been able to find these different menu item types if I hadn't told you? And then how would you know what configuration options to use for them without me telling you?
Normally, you would have to go to the documentation for each plugin you're using, and search through it to find the exact information you need. But this has several issues: you're trusting that the documentation for that plugin is up-to-date, that it contains no errors, and even that the developer even has documentation! But even worse, what if you're using an older version of the plugin than is being documented, so that the public documentation is actually different from your version? Well then you're completely out-of-luck!
Fortunately, Orchid does not suffer from any of these problems because the admin panel brings all of this information to you automatically, perfectly up-to-date with your current plugins no matter their version. So let's find out where to get all this information!
Click the "hamburger icon" at the top-right of the screen. It will open a drawer that looks like the following:
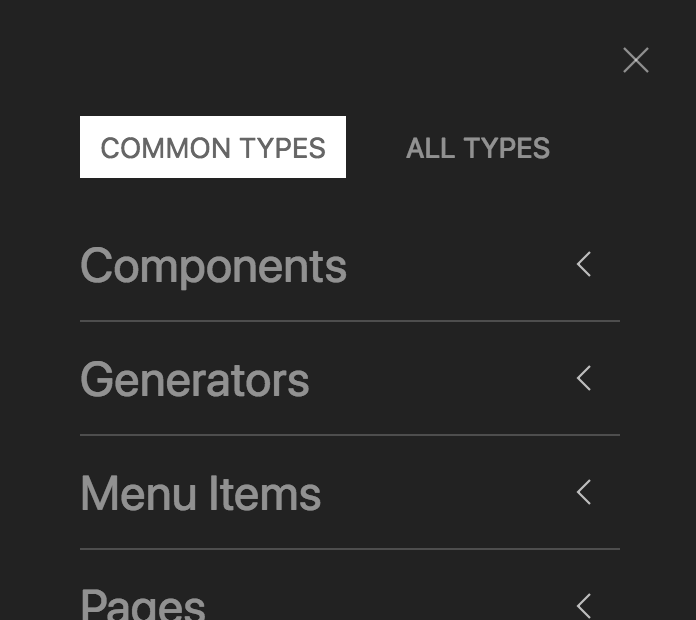
This drawer contains a list of everything that is registered by all plugins, grouped by their type. There are two tabs in this drawer. The first contains the "Common Types", which are the objects you're most likely to need to configure. You'll see categories in there for "pages", "menu items", and a few more. The other tab, "All Types" contains all these common types, and many other objects that might be of interest to plugin or theme developers.
But let's click the "Menu Items" row. It will expand to show a list of all menu items that are available, along with a short description of each. You'll notice this list includes all of the "link", "page", "static pages", and "page IDs" menu items we used in that tutorial. Clicking into one of these items, such as "link", will take you to a page that looks like the following:
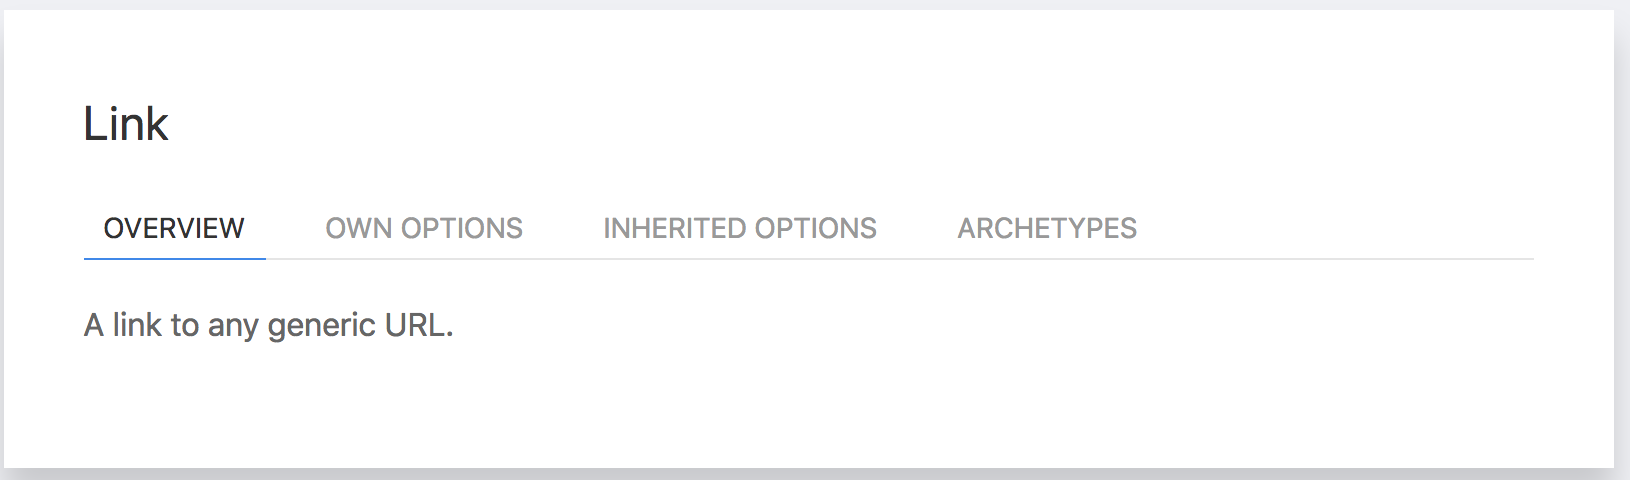
You'll notice that this page includes the same four tabs that were on the collections pages. That's because Orchid uses a unified system for managing metadata, which allows everything to be automatically documented in a similar way.
The first tab is always an "overview" of that item. Menu items will all include a short description to help you understand what they do. Some other types of objects, like components, might include code snippets to help you get started using them.
But the magic starts to become apparent on the next two tabs: "own options" and "inherited options". They both contain a table of options for that item, and looks like the following:
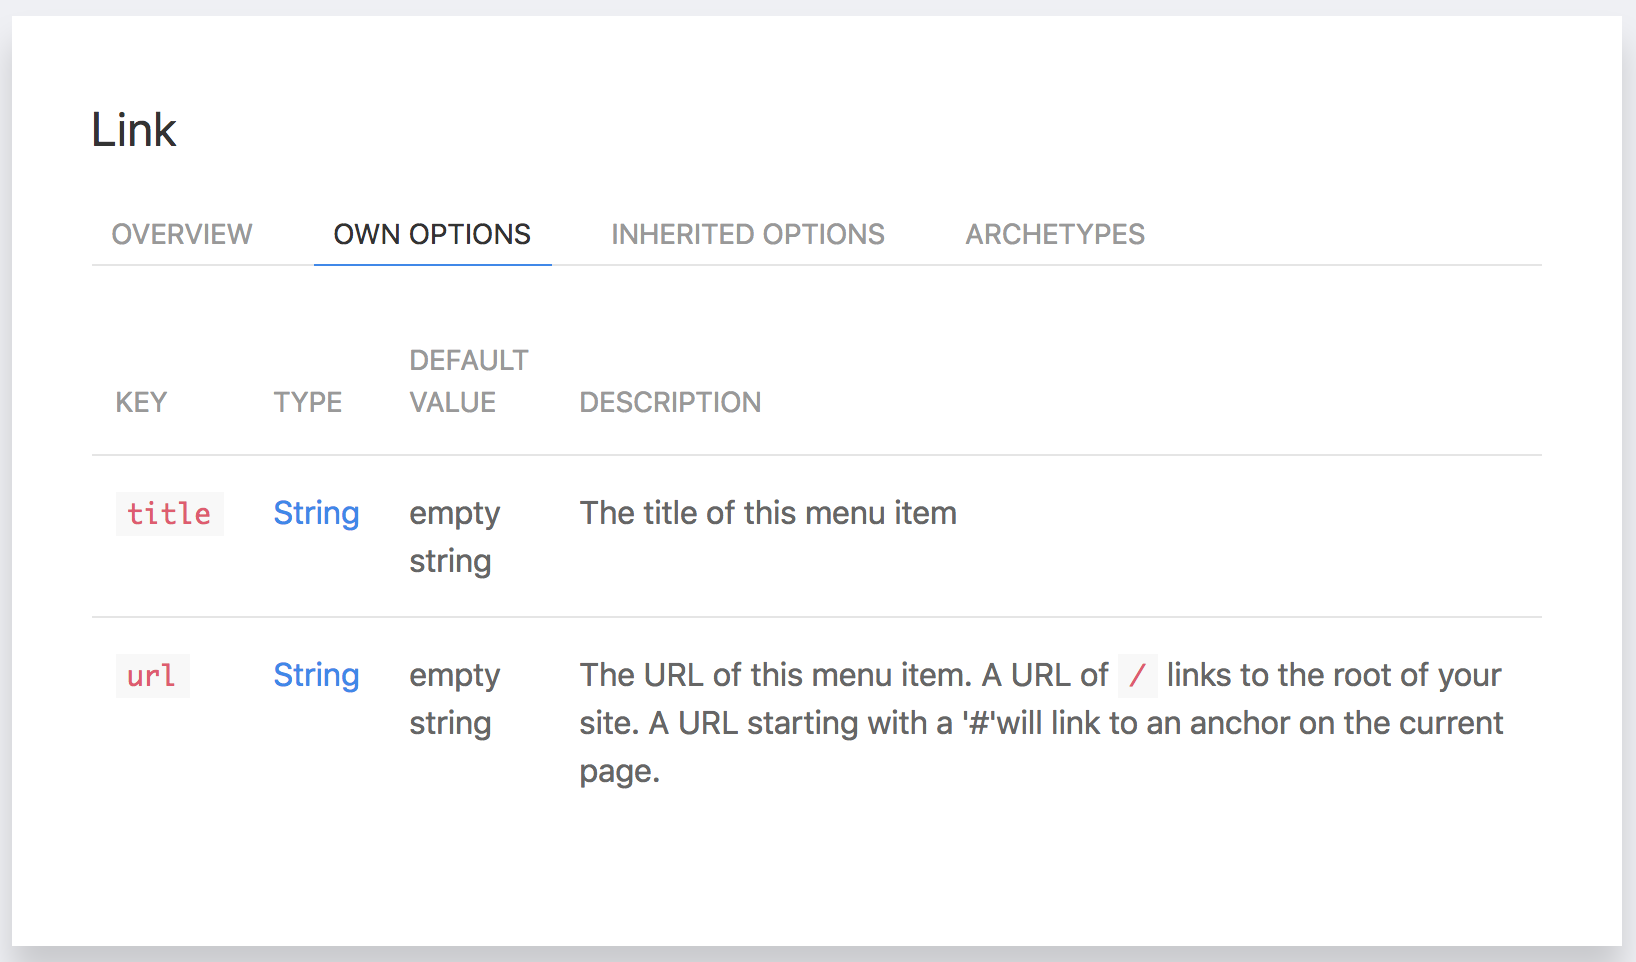
This like tells you exactly what options can be used to set up your "link" menu item. Remember in the menu items
tutorial I just told you to add the title and url options to configure it correctly? Well this is how you find that
out! It also includes a short description for each option, and the default value for each of these options so you know
how it will behave if you don't provide that option. The "inherited options" tab will show you the configurations
available to all menu item types, not just the "link" type.
The last tab, "archetypes", is empty for the "link" menu item. But recall that the previous tutorial showed you how to use archetypes to more easily configure batches of static pages all at one, so let's check out this tab on the "Static Page" page. You can find it under the "pages" link in the drawer, and the "archetypes" tab should look like the following:

This tab shows a table of all the possible Archetypes for each item, if they exist, along with short descriptions of each. This will help you to know how you can leverage Archetypes to minimize repeated configurations in your site. This list is also ordered such that the archetypes later in the list override those earlier in the list.
Together, the overview, options, and archetypes for Orchid's various objects give you a complete picture for how to use that object to customize your site. Rather than going to the docs websites for all your plugins, Orchid brings all that documentation to you in one central location to make it easier than ever to get building your site, and helps you discover features that might otherwise be missed.
Conclusion
There is a lot more than you can do with the admin panel, and different plugin may also include their own unique features, but collection inspection and plugin discovery/documentation are definitely the among the best features of Orchid's admin panel. I would encourage you to poke around some of the other plugin objects and get comfortable navigating the admin panel, because it will be an indispensable tool as you build out your site!